Introduction
Steve Jones – MVP, Editor Extraordinaire, and Car Guy – has been “gently encouraging” me to write something business intelligence-related for SQLServerCentral.com for some time now. SSIS 101 is intended to help people up some of the slopes of the SSIS learning curve. I hope to make SSIS 101 a regular effort, but we will see how this goes.
If anyone understands how difficult SSIS can be to learn, it’s those of us who learned it “back in the day”. While writing the Wrox book Professional SQL Server 2005 Integration Services (http://www.amazon.com/Professional-Server-Integration-Services-Programmer/dp/0764584359), the author team had to learn the product. Now I’ve been learning new software for… well, for several years… and this was challenging for me. This is one of the reasons I enjoy training people on SSIS for Solid Quality Mentors (http://www.solidq.com), and also one of the reasons I like writing articles and blog posts such as this!
Move It! Move It! Move It!
SQL Server Integration Services (SSIS) was built move data around the enterprise. It can certainly do a lot more than this but if you have data at Point A and you wish it to also be at Point B don’t play, buckle down and learn SSIS.
I can hear you thinking, “Ok Andy, but why load incrementally?” I’m glad you asked! Time is the big reason. Destructive loads – truncating or deleting data first, then loading everything from the source to the destination – takes longer. Plus you’re most likely reloading some data that hasn’t changed. If the source data is scaling, you may approach a point when you simply cannot load all that data within the nightly time-window allotted for such events. So let’s only handle the data we need to – the new and updated rows.
The Setup
I am using the AdventureWorks.Person.Contact table in this article. I also created a Destination database named AndyWorks. I copied the AdventureWorks.Person.Contact table into AndyWorks as AndyWorks.dbo.Contact. I am using 64-bit SQL Server 2005 Developer Edition with SP2 applied.
To create the database and table I use the follow Transact-SQL statements:
-- Create the AndyWorks database...
use master
go
if exists(select name fromsys.databases wherename = 'AndyWorks')
  drop database AndyWorks
go
create database AndyWorks
go
-- Create the Contact table...
use AndyWorks
go
if exists(select name fromsys.tables wherename = 'Contact')
  drop table dbo.Contact
go
CREATE TABLE dbo.Contact
(
ContactID intNOT NULL,
NameStyle bitNOT NULL,
Title nvarchar(8)COLLATE Latin1_General_CS_AS NULL,
FirstName nvarchar(50)COLLATE Latin1_General_CS_AS NOT NULL,
MiddleName nvarchar(50)COLLATE Latin1_General_CS_AS NULL,
LastName nvarchar(50)COLLATE Latin1_General_CS_AS NOT NULL,
Suffix nvarchar(10)COLLATE Latin1_General_CS_AS NULL,
EmailAddress nvarchar(50)COLLATE Latin1_General_CS_AS NULL,
EmailPromotion int NOTNULL,
Phone nvarchar(25)COLLATE Latin1_General_CS_AS NULL,
ModifiedDate datetime NOTNULL
)
To populate the new dbo.Contact table I execute the following Trabsact-SQL script:
-- Populate the Contact table...
insert into dbo.Contact
select
ContactID
,NameStyle
,Title
,FirstName
,MiddleName
,LastName
,Suffix
,EmailAddress
,EmailPromotion
,Phone
,ModifiedDate
from AdventureWorks.Person.Contact
Anatomy 101
How does it work? Figure 1 describes the anatomy of an incremental load. It doesn’t matter whether you are using T-SQL, SSIS, or another ETL (Extract, Transform, and Load) tool; this is how you load data incrementally. Read, Correlate, Filter, and Write.

Figure 1: Anatomy of an Incremental Load
Feel free to start a new SSIS project in Business Intelligence Development Studio (BIDS) and follow along. First, add a Data Flow Task to the Control Flow:

Figure 2: Add a Data Flow Task
Double-click the Data Flow Task to open the Data Flow (tab) editor.
Read
First you read data into the Data Flow from a source. It could be SQL Server but it could also be flat files. SSIS provides a ton of connectivity out of the box: OLEDB, ADO.Net, ODBC, and more. But those aren’t your only options! You can use a Script Component as a Source Adapter, allowing you to access custom data sources from script. If that isn’t enough, you can also build a custom Source Adapter – extending SSIS using your .Net language of choice.
Your source may be a table or view, it may be a query. For those of us who like to squeeze every cycle possible out of an application, using a query for relational database sources will provide better performance than specifying a table or view name.
Figure 3 shows a portion of the General page of an OLEDB Source Adapter I’ve added to my Data Flow:
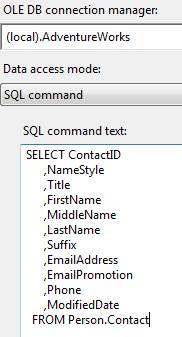
Figure 3: SQL Command Data Access Mode for an OLEDB Source Adapter
Correlate
Next you correlate the data you just loaded from the Source with the Destination. You do this to load the SSIS data pipeline with enough information to distinguish New, Updated, and Unchanged rows. How? In T-SQL we would use a left join:
SELECT Src.ContactID
,Src.NameStyle
,Src.Title
,Src.FirstName
,Src.MiddleName
,Src.LastName
,Src.Suffix
,Src.EmailAddress
,Src.EmailPromotion
,Src.Phone
,Src.ModifiedDate
,Dest.ContactID
,Dest.NameStyle
,Dest.Title
,Dest.FirstName
,Dest.MiddleName
,Dest.LastName
,Dest.Suffix
,Dest.EmailAddress
,Dest.EmailPromotion
,Dest.Phone
,Dest.ModifiedDate
FROM AdventureWorks.Person.Contact Src
LEFT JOIN AndyWorks.dbo.Contact Dest ON Dest.ContactID = Src.ContactID
Listing 1: Source-to-Destination Correlation T-SQL Statement
A couple things about this statement:
1. This query returns all rows in the source whether there is a corresponding row in the destination or not. We’ll use this to detect new rows in the source data.
2. This query returns all the columns from the destination. We’ll compare to source rows to detect changes (updates) in the source data.
We do this in SSIS using a Lookup Transformation. If you’re following along in BIDS, drag a Lookup Transformation onto the Data Flow canvas and connect the output of the OLEDB Source Adapter to it. On the Reference Table tab we add a query against the Destination as shown in Figure 4.
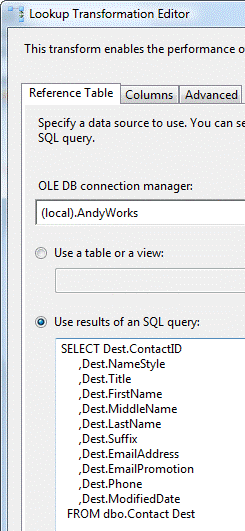
Figure 4: Lookup Reference Table
On the Columns tab, define the ON clause in the join by dragging ContactID from the Available Input Columns to the ContactID field on the Available Lookup Columns. Select all columns in the Available Lookup Columns by checking the checkbox next to each. Finally, alias the columns by adding the “Dest_” prefix to each Output_Alias as shown in Figure 5 (you will thank me later):
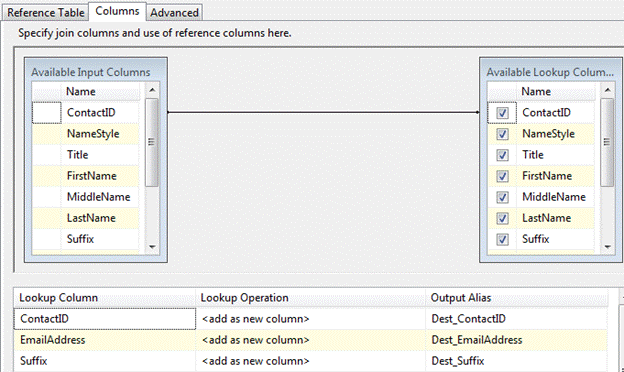
Figure 5: Configuring the Lookup Columns tab
So far, we’ve defined the SELECT clause of our Source-to-Destination correlation T-SQL statement. We’ve also defined the ON clause of our join. By default, however, a Lookup Transformation performs an INNER JOIN, not a LEFT JOIN. What’s more, if the INNER JOIN cannot find a match in the Lookup results (the Destination query in this case) the transformation fails.
Fear not, there is a way to configure the Lookup Transformation so it behaves like a LEFT JOIN. Click the Configure Error Output button on the lower left side of the Lookup Transformation editor. Change the Lookup Output Error column from “Fail component” (the default) to “Ignore failure” as shown in Figure 6. Click the OK button and then close the Lookup Transformation Editor. Voila! A LEFT JOIN Lookup Transformation!

Figure 6: Configuring the Lookup Transformation Error Output
Filter
The next step is Filtering. This where we decide which rows are New, which are Changed, and perhaps most important; which are Unchanged. In SSIS we use a Conditional Split Transformation for filtering. Drag one onto the Data Flow canvas and connect the output of the Lookup to it as shown in Figure 7:
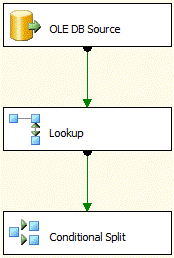
Figure 7: Adding the Conditional Split
Before we edit the Conditional Split let’s talk about how it works. If you’ve used a Switch statement in C# or a Select Case statement in Visual Basic, you are familiar with the concept. One and only one condition evaluates to True for each input, and one and only one output path is taken as a result. Comparing the input to all of the conditions, more than one condition may evaluate True. Therefore, the Switch or Select Case statement evaluates the input for the first True condition, and fires that output. Conversely, if none of the conditions evaluate to True, there is an Else condition which will fire.
In SSIS, we use this to redirect rows flowing through the Data Flow. Each row entering the Conditional Split will be assigned to one and only one Conditional Split output buffer (more on Conditional Split output buffers in a bit). We’ll define Conditional Split output buffers for New and Changed rows.
Double-click the Conditional Split to open the editor. Define a new Conditional Split Output by typing “New” in the Output Name column. Define the Condition for the New Output by typing “IsNull(Dest_ContactID)” in the Condition column. This effectively defines New rows as rows where we could not find a matching ContactID value in the Destination when we did our Lookup. See why the LEFT JOIN is so important? When there’s no match, LEFT JOIN returns a NULL.
NOTE: The Condition column uses SSIS Expression Language. In learning SSIS, the SSIS Expression Language is a steeper (and sometimes slippery) slope on the learning curve. A good explanation of why this works the way it does is beyond the scope of this article.
Add a second Output named “Changed”. The Condition for detecting changes in SSIS Incremental Loads is loads (pun intended) of fun. We are not going to go all out and produce Production-ready code here because all we’re interested in is demonstrating the principle. We need to detect a difference in one or more columns between our Source and Destination. This is why we loaded the Data Flow pipeline with all those “Dest_” columns earlier, so we could compare them to the Source columns (are you thanking me yet?). The Condition we use to accomplish this is:
((NameStyle != Dest_NameStyle) || ((IsNull(Title) ? "" : Title) != (IsNull(Dest_Title) ? "" : Dest_Title)) || (FirstName != Dest_FirstName) || ((IsNull(MiddleName) ? "" : MiddleName) != (IsNull(Dest_MiddleName) ? "" : Dest_MiddleName)) || (LastName != Dest_LastName) || ((IsNull(Suffix) ? "" : Suffix) != (IsNull(Dest_Suffix) ? "" : Dest_Suffix)) || (EmailAddress != Dest_EmailAddress) || (EmailPromotion != Dest_EmailPromotion) || (Phone != Dest_Phone) || (ModifiedDate != Dest_ModifiedDate))
Listing 2: Changed Rows Condition
The double-pipes (“||”) indicate OR. This logic compares each Source column to each Destination column – checking for a difference. If one (or more) difference(s) are detected, the OR conditions evaluate to True and this row is sent to the Changed Output.
Note: The Suffix, MiddleName, and Title columns of the Condition expression manage NULLs by converting them to empty strings on the fly. This is but one method of addressing NULLs when comparing column values in SSIS Expression Language. NULL-handling in SSIS Expression Language could darn-near rate its own article!
Notice there is no check for ContactID. That’s because ContactID is used to LEFT JOIN the Source and Destination in the Lookup Transformation. Destination ContactID will either be NULL or always match the Source ContactID. And if Destination ContactID is NULL it is because that row doesn’t exist in the Destination – which makes it a New row. Since the Conditional Split evaluates each Condition in order, New rows are assigned to the New Output buffer and are never evaluated by the Changed Condition logic.
Our Conditional Split Transformation now has three non-error Outputs. “Three?” I hear you ask, “But we’ve only defined two Andy.” That is correct. The third is the Default Output at the bottom of the editor. You can change the name from “Conditional Split Default Output” to “Unchanged” – because rows that are neither New nor Changed will flow out of this output buffer.
If you’ve been following along in BIDS, your Conditional Split editor will look something like Figure 8:
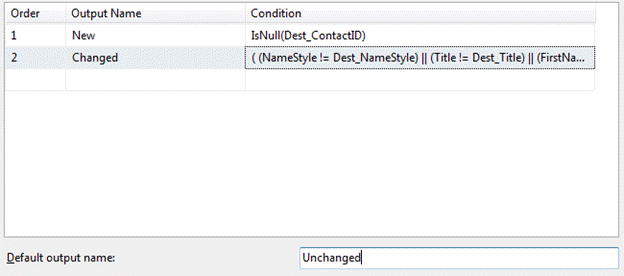
Figure 8: Filtering with a Conditional Split
Write: New Rows
Finally, it’s time to write our data to the Destination. If you’re following along in BIDS drag an OLEDB Destination Adapter onto the Data Flow canvas. Rename the Destination Adapter “New_Rows”. Connect an output from the Conditional Split to the Destination Adapter. When you do, you are prompted to select a Conditional Split Output buffer as shown in Figure 9:
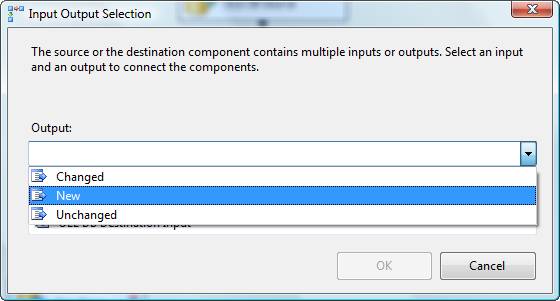
Figure 9: Selecting the “New” Conditional Split Output
Select New and click the OK button. Double-click the Destination Adapter to open the editor. Create or select a Connection Manager for the destination database instance, choose “Table or view” as the data access mode, and select or create the destination table as shown in Figure 10:
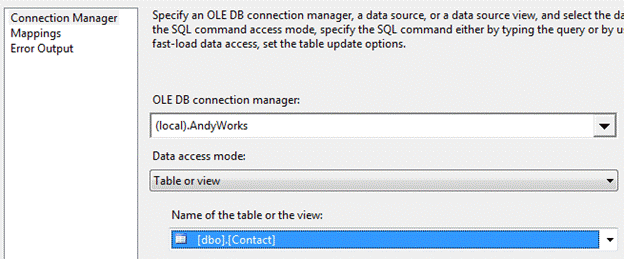
Figure 10: Configuring the New Rows Destination
Click the Mappings page and map rows in the Data Flow pipeline to the destination as shown in Figure 11:
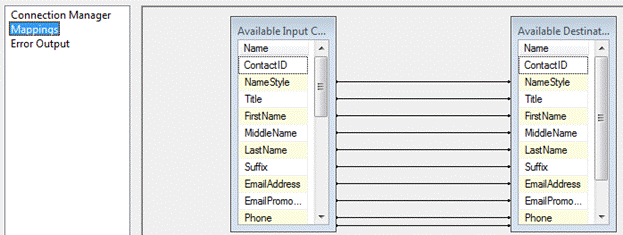
Figure 11: Mapping the Data Flow Pipeline Rows to the Destination Columns
Note the mapping between ContactID fields. The source ContactID column is an Identity column. The destination ContactID column must not be an identity column or SSIS will consider it “read-only” and not allow this column to be updated.
Click the OK button to close the Destination Adapter editor.
Write: Changed Rows
There are a couple ways to write changes. When I conduct SSIS training for Solid Quality Mentors, I spend some time showing folks why some ways work better than others. Here, I am simply going to show you how I build this in Production-ready code. In a word I use set-based updates. Ok, that’s three words. And a hyphen. But you get the point.
To do a set-based update we first stage all the data we need in a stage table. When we’re done with our Data Flow task, we execute a single T-SQL UPDATE statement joining the contents of this table to the Destination table. It’ll be fun – you’ll see.
If you’re still with me in BIDS drag an OLEDB Destination Adapter onto the Data Flow canvas. Rename it “Changed_Rows”. Connect a Conditional Split Output to the OLEDB Destination. When prompted this time, select the Changed Output of the Conditional Split.
Double-click the Destination Adapter to open the editor. Select the destination connection manager and set the data access mode property to “Table or view”. For the name of the table or view property, click the New button to the right of the dropdown. The Create Table form displays with a column defined for every column in the Data Flow pipeline. The data types are even correct – read from the pipeline metadata – how cool is that? Since we don’t need the Dest_ columns, remove them. Your Create Table form should appear as shown in Figure 12:
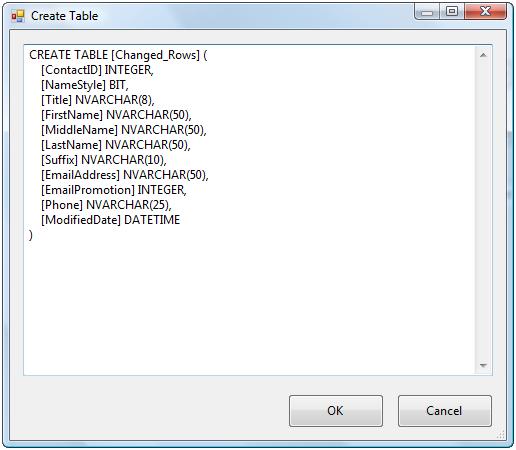
Figure 12: Creating the Changed_Rows table
As soon as you click the OK button, the table is created in your destination database.
When you click the Mappings page all fields should auto-map to their proper destination. Click the OK button to complete configuration of the Changed_Rows Destination Adapter. Your Data Flow should appear as shown in Figure 13:
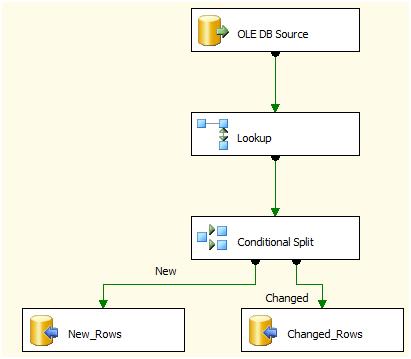
Figure 13: Completed Data Flow Task
To complete the set-based update, return to the Control Flow.
Drag a new Execute SQL Task onto the Control Flow canvas and connect it to the Data Flow Task. Double-click it to open the editor. Set the Connection property to the Destination connection manager. Click the ellipsis in the SQLStatement property and add the following T-SQL statement:
Update Dest
 Set Dest.NameStyle = Stg.NameStyle
       ,Dest.Title = Stg.Title
       ,Dest.FirstName = Stg.FirstName
       ,Dest.MiddleName = Stg.MiddleName
       ,Dest.LastName = Stg.LastName
       ,Dest.Suffix = Stg.Suffix
       ,Dest.EmailAddress = Stg.EmailAddress
       ,Dest.EmailPromotion = Stg.EmailPromotion
       ,Dest.Phone = Stg.Phone
       ,Dest.ModifiedDate = Stg.ModifiedDate
 From dbo.Contact Dest
InnerJoin dbo.Changed_Rows Stg On Stg.ContactID = Dest.ContactID
Listing 3: Set-based update
Click the OK button to close the Enter SQL Query form, and then click the OK button to close the Execute SQL Task editor.
To be thorough, you do not want to continue adding changes to the Changed_Rows table each execution. Sometime before each execution of the incremental load, you want to truncate this table. Technically, you could truncate at the end of the set-based update listed above, but here’s why I do not do this: When data integrity issues come into question you are guilty until proven innocent. I keep that data around in case I need to see where an update originated. I do a lot more than this, but this is a minimum requirement in my opinion. Telling my customer or boss “I messed up here, but I found it and fixed it” goes over a lot better than “I don’t know what happened or why”. Trust me.
I add another Execute SQL Task at the very beginning of my Control Flow and set it to execute a Truncate Table statement on my Changed_Rows table. When I’m done, my Control Flow looks like Figure 14:
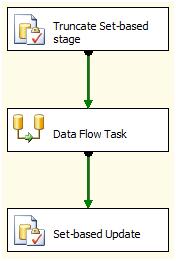
Figure 14: Completed Control Flow
Run It!
Now comes the part I love – testing!
Before test execution, I prepare the data by executing the following statements against the destination database:
update dbo.Contact
setEmailAddress = '_' + EmailAddress
where ContactID % 5 = 0
delete dbo.Contact
where ContactID > 18500
Listing 4: Creating Changes and New Rows
Click the VCR-style Run button or press the F5 key to execute the SSIS package in the BIDS debugger. Hopefully you see what I see – green boxes!
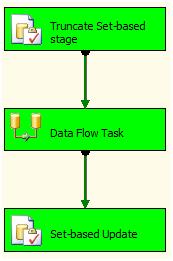
Figure 15: Successful Control Flow Execution
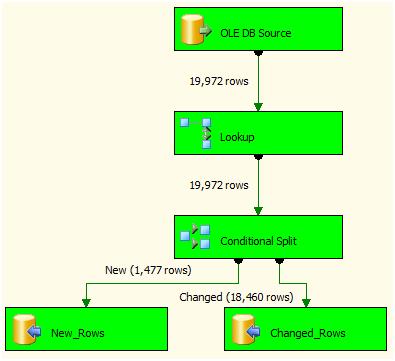
Figure 16: Successful Data Flow Execution
Conclusion
This is one way to implement incremental loads in SSIS. I like this method for lots of reasons. Chief among them: it’s straightforward, which improves maintainability.


