SSIS - Creating Test Data for Performance and Functionality Tests
Many of you have learnt to beat SQL Server into generating test data for you to fill the tables you need when checking the functionality and performance of your solutions, or you make do with the sample databases available, such as Northwind or AdventureWorks. In this article we'll use SQL Server Integration Services to perform the following tasks:
- Creating tables and indexes
- Generating test data
- Do some benchmarking
- Cleaning up
As we'll see, SSIS is very well suited for this work, and hopefully this construct will be useful as a template and starting point for your own tests. Since the focus is on generating the test data, the actual benchmarking will be a simple but hopefully still useful test on the data flow (a.k.a pipeline) components used.
If you are already savvy with the basics of creating packages, connection managers etc, I suggest you skip down to Creating tables and indexes.
Overview
We'll create two packages: Initialize.dtsx and Cleanup.dtsx. You would typically also create at least one more package, say Benchmark.dtsx. For this article though, we'll do our benchmarking by looking at the record insertions inside Initialize.dtsx.
| Tip: Having two packages makes it easy to run one or the other; combining initialization and cleanup in a single package is of course also possible, but requires adding some logic to select between them. My simple guideline is: If two parts almost always will be run together, consider using a single package, otherwise consider separate packages. |
Creating the solution
To get started, we'll create a new SSIS solution for our project. In a later article, we'll add more projects to this solution that will consume the test data. I've called mine Create_Test_Data as shown below.

Creating packages
Create two new packages; for each package:
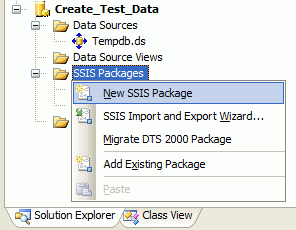
Right-click "SSIS Packages" in the Solution Explorer and select "New SSIS Package"
Select the newly created package called "Package1.dtsx", hit F2, rename the first to Initialize.dtsx, the second to Cleanup.dtsx
Answer "Yes" to the question on if you want to rename the package object too
Tip: By default, when you save a package it will be stored as an XML file in your Visual Studio project folder. When you build a package (or the whole solution), Visual Studio creates a new package file in the "bin" sub directory of the project folder. When you change and save a package, only the package file in the main project directory will change, the copy stored in the "bin" subdirectory will not change. If you clean a package or solution, the files in the "bin" subdirectory will be removed. These distinctions are important when you access the package files on disk directly, which is quite common for moving packages around, and for executing them with the dtexec.exe and dtexecui.exe utilities. Tip: Packages can also be stored in SQL Server. A loose guideline is to store packages in the file system during development, store in SQL Server for production, and use your judgement for the steps in between. |
Creating the Data Source and Connection Manager
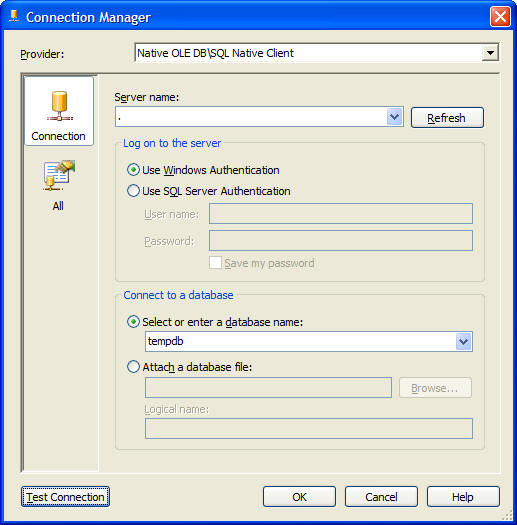
To centralize the database connection information, we'll first create a Data Source that points to our database; I've decided to use an OLE DB connection to the tempdb on my local host.
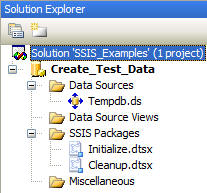
The Solution Explorer should now look like this:
In both packages, we'll use the "Create Connection From Data Source..." command to create a Connection Manager - the four arrows on the icon (as seen below) shows that this Connection Manager is configured using a Data Source.

| Tip: Data Sources can be shared by all packages in a project, but are local to each project. They can not be shared between projects, even in the same solution. Furthermore, Data Sources are not deployable, i.e. they are 'only' a very useful way of centralising the Connection Manager settings inside Visual Studio - the connection managers are what actually gets deployed. |
Creating tables and indexes
Add two Execute SQL Task components and one Data Flow Task from the toolbox, and connect them as shown below. I've changed the names of my tasks to reflect their function.
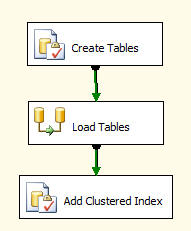
For our tests we want two tables; we'll create a large reference table called PERMANENT with many records, and a typically smaller table called INCREMENT, by adding this code to the Create Tables task, and setting the Connection property to the Tempdb Connection Manager:
IF EXISTS (SELECT * FROM dbo.sysobjects WHERE id = OBJECT_ID(N'[dbo].[PERMANENT]')
  AND OBJECTPROPERTY(id, N'IsUserTable') = 1)
DROP TABLE [dbo].[PERMANENT]
GO

CREATE TABLE [dbo].[PERMANENT](
[FirstKey] [int] NOT NULL,
[SecondKey] [int] NOT NULL,
[Fact1] [int] NOT NULL,
[Fact2] [int] NOT NULL
) ON [PRIMARY]
GO

IF EXISTS (SELECT * FROM dbo.sysobjects WHERE id = OBJECT_ID(N'[dbo].[INCREMENT]')
  AND OBJECTPROPERTY(id, N'IsUserTable') = 1)
DROP TABLE [dbo].[INCREMENT]
GO

CREATE TABLE [dbo].[INCREMENT](
[FirstKey] [int] NOT NULL,
[SecondKey] [int] NOT NULL,
[Fact1] [int] NOT NULL,
[Fact2] [int] NOT NULL
) ON [PRIMARY]
GO
| Tip: It's often useful to create your tables before creating the rest of the package - that enables the other tasks to see the meta data of your tables. Simply right-click on the Create tables task and run "Execute Task" - it will run just that one task and no others. |
Load Tables inserts the test data and we'll cover that below, while Add Clustered Index does what it says on the tin:
ALTER TABLE [dbo].[PERMANENT] ADD CONSTRAINT [PK_PERMANENT] PRIMARY KEY CLUSTERED
(
[FirstKey] ASC,
[SecondKey] ASC
)WITH (SORT_IN_TEMPDB = OFF, ONLINE = OFF) ON [PRIMARY]
| Tip: You might want to experiment with how to add the index: on the populated table like described here (since it's clustered it will rearrange all the data), or add it as part of the table creation, which will update the index as the records get inserted. The performance characteristics depends heavily on the exact method used for the record inserts. |
Cleanup Package
While we're at it, let's drop an Execute SQL Task onto our Cleanup.dtsx package, add the code below to the SQLStatement property, and create a new Connection Manager from our tempdb Data Source, all within the task edit panes:

IF EXISTS (SELECT * FROM dbo.sysobjects WHERE id = OBJECT_ID(N'[dbo].[PERMANENT]')
  AND OBJECTPROPERTY(id, N'IsUserTable') = 1)
DROP TABLE [dbo].[PERMANENT]
GO
IF EXISTS (SELECT * FROM dbo.sysobjects WHERE id = OBJECT_ID(N'[dbo].[INCREMENT]') AND OBJECTPROPERTY(id, N'IsUserTable') = 1) DROP TABLE [dbo].[INCREMENT] GO
Now we can setup and later tear down our test environment with only two mouse clicks!
Variables Are Good For Your Health!
Back to Initialize.dtsx, let's add some to control the package; it will give us several options for manipulating the settings, including using the GUI in Visual Studio as well as using parameters when running it from the command line with the dtexec.exe utility (shown below):
dtexec /f Initialize.dtsx /set \package.variables[PermanentRecords].Value;2000000 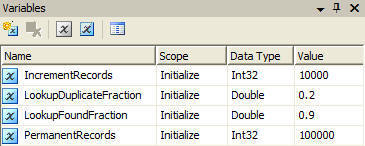
Let's add variables that do the following:
- IncrementRecords and PermanentRecords specifies number of records inserted in our two tables
- LookupDuplicateFraction controls the percentage of duplicate keys in the INCREMENT table records, e.g. 20%
- LookupFoundFraction specifies the percentage of records in INCREMENT that have matching records in PERMANENT.
The last two variables controls the distribution of the keys we'll generate, we'll use that in a later article when measuring the performance of lookups. Here though, it will make generating the test data a bit more interesting.
| Tip: Variables are added at the scope of the currently selected task. Make sure you have the right task selected, or as in our example no task selected, which will result in the top package level scope for the variables - there's no easy way to change the scope, except to delete and recreate the variable. |
Generating test data
Load Tables is a data flow (a.k.a. pipeline) task that can do in-memory processing of records very quickly. We've added one script source component below and two OLE DB Destination components.
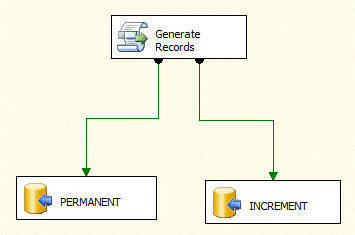
| Tip: Add and connect data flow components in the same order as the data actually flows, i.e. start with source components, then any transform components connected to the source components, and finally your destination components. This way, the meta data from the upstream components are available (which is often required) when configuring the downstream components. Tip: By default SSIS validates meta data at design time, which is good since it identifies issues early in the development of a package. At times this creates unwanted validation warnings or errors, typically when schema creation and access are combined in a single package - before running the package the first time, the access components tries to find a schema that doesn't exist yet. Resolve this by either splitting creation and access into different packages, or delay or disable validation for the offending components. In the downloadable package, the Load Tables data flow has "DelayValidation" set to true for this very reason. A second possibility is to set "ValidateExternalMetadata" to false on the two OLE DB Destinations PERMANENT and INCREMENT. |
We'll use a single script component to generate records for both our tables, but it has other uses too; it can be:
- A destination, consuming records from its input
- A transform, both accepting an input, and having one or more outputs
- A source, creating records on one or more outputs
By default, a script source component comes pre-configured with one output called "Output 0". We'll rename that output to "OuputPermanent" and add a second output called "OutputIncrement". To both outputs, we add 4 columns, corresponding in name and type to the fields we want our generated records to have.
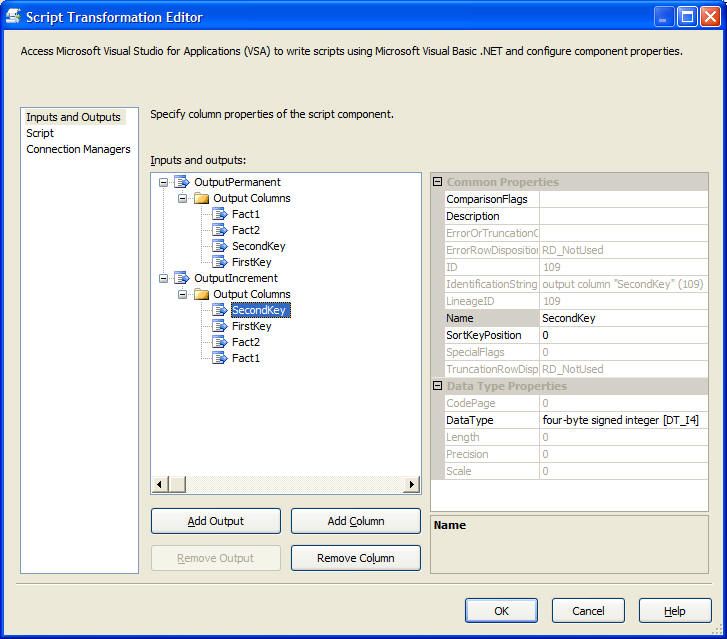
Next, specify our Connection Manager:

On the Script pane, specify all variables that our script will use. This makes them available in our script as strongly typed objects, complete with Intellisense!

Hit "Design Script..." to enter the VBA environment, and add this code to the CreateNewOutputRows() function:
Public Overrides Sub CreateNewOutputRows()
Dim maxFirstKeys As Integer = CType(Me.Variables.PermanentRecords _
/ 10000 + 10, Integer)
Dim i As Integer
Dim tmp As Integer
Dim tmpOld As Integer

Rnd(-1) ' Needed to generate same random sequence every run
Randomize(1)
For i = 0 To Me.Variables.PermanentRecords - 1
OutputPermanentBuffer.AddRow()
OutputPermanentBuffer.SecondKey = i ' Guarantees index is unique
OutputPermanentBuffer.FirstKey = i Mod maxFirstKeys
OutputPermanentBuffer.Fact1 = i Mod 1111 ' Add some facts
OutputPermanentBuffer.Fact2 = i Mod 777
Next i
OutputPermanentBuffer.EndOfRowset()

tmpOld = 1
Rnd(-2) ' Needed to generate same random sequence every run
Randomize(2)
For i = 0 To Me.Variables.IncrementRecords - 1
OutputIncrementBuffer.AddRow()
tmp = CType(Rnd() * Me.Variables.PermanentRecords, Integer)
If (Rnd() > Me.Variables.LookupFoundFraction) Then
tmp = tmp + Me.Variables.PermanentRecords
End If
If (Rnd() < Me.Variables.LookupDuplicateFraction) Then
tmp = tmpOld
End If
OutputIncrementBuffer.SecondKey = tmp
OutputIncrementBuffer.FirstKey = tmp Mod maxFirstKeys
OutputIncrementBuffer.Fact1 = i Mod 1313 ' Add some facts
OutputIncrementBuffer.Fact2 = i Mod 1717
tmpOld = tmp
Next i
OutputIncrementBuffer.EndOfRowset()
End Sub
There's a few things to note about the script:
- Since we created a script source component, the runtime will call the function CreateNewOutputRows(), where we are responsible for creating new records 'out of thin air' (or by reading some goofy file on disk, or by estimating the number of butterflies flapping away in Brazil, or...)
- For each output the runtime has created an object (e.g. OutputIncrementBuffer) that can create records with AddRow(), accept fields values (e.g. OutputIncrementBuffer.SecondKey = tmp), and signal that no more records will be created for the output with EndOfRowset()
- There's many duplicates in the PERMANENT.FirstKey field, but PERMANENT.SecondKey contains unique values to work with our unique clustered index
- Me.Variables.LookupFoundFraction controls how large a fraction of the INCREMENT records have a matching record in the PERMANENT table
- Me.Variables.LookupDuplicateFraction controls how large a fraction of the INCREMENT records have a matching record in the INCREMENT table itself
Verify test data
Hit F5 to run the package, and then look at the beginning and end of the two tables:
select FirstKey, SecondKey from INCREMENT order by FirstKey, SecondKey;
select FirstKey, SecondKey from PERMANENT order by FirstKey, SecondKey;
| PERMANENT | INCREMENT | |||
| FirstKey | SecondKey | FirstKey | SecondKey | |
| 0 | 0 | 0 | 60 | |
| 0 | 20 | 0 | 320 | |
| 0 | 40 | 0 | 320 | |
| 0 | 60 | 0 | 380 | |
| 0 | 80 | 0 | 620 | |
| --- | --- | --- | --- | |
| 19 | 99919 | 19 | 193359 | |
| 19 | 99939 | 19 | 193359 | |
| 19 | 99959 | 19 | 193739 | |
| 19 | 99979 | 19 | 193739 | |
| 19 | 99999 | 19 | 198559 | |
As we can see, the range of numbers look OK, as do the fact that we have some duplicate records in the INCREMENT table.
Do some benchmarking
Let's measure the speed of inserting records into our two tables, using various settings. Even though you can pretty much guess the outcome beforehand, it might come in handy as a template for doing further tests. Setup:
- Windows XP SP2
- SQL Server 2005 Developer Edition, June CTP
- Single CPU AMD 1800+
- 1.5GB memory
- Data and log files on a single disks, simple recovery model
Before we start, minimize overhead inside the Load Tables task by setting the PreCompile property of the Generate Records script to true, otherwise the script will have to be compiled every time it runs. You then need to enter and exit "Design Script..." once to have the script actually be compiled.
| Tip: Only enable PreCompile when and where necessary - it increases the size of the packages, and the Visual Studio environment can become sluggish (at least in the current beta version) if you have many of them in your solution. |
Since there's only a few runs to make, we'll make the appropriate settings and fire them off manually by hitting F5. Timings we'll get by checking the "Progress" tab after each run, and noting the "Elapsed time" for the "Task Load Tables" section, and we'll run each test multiple times to check that we get consistent results. In later articles we'll be more stringent about running without debugging, automating the tests etc., but this is enough to get us started:
| (Time in seconds, Inserts per second) | Small dataset: 50,000 + 200,000 records | Large dataset: 100,000 + 400,000 records |
| OpenRowset | 142.4s, 1756 inserts/s | 272.9s, 1832 inserts/s |
| OpenRowset Using FastLoad | 4.7s, 53192 inserts/s | 9.4s, 53192 inserts/s |
A few points to note:
- On my setup, using FastLoad (i.e. bulk load) is ~30x faster than regular inserts
- Insert speed was roughly constant when doubling the size of the dataset
- We loaded the tables before creating any index on PERMANENT
- For more complex data flows than this one, DefaultBufferMaxRows is an important tuning parameter - here we left it at the default 10,000
- Performance might of course change in the release version of SQL Server 2005, but more importantly, the measured performance differences with FastLoad are a direct effect of the strategy used
Cleaning up
Don't forget to execute the Cleanup.dtsx task - I think one of the greater advantages of the new development environment is that it's much easier to collect all the bits and pieces of a project in a single place, be that packages, SQL scripts, documentation or what have you. One thing I'll certainly be using this for is performing a lot more full end-to-end tests.
Conclusion
Some salient points:
- SSIS is a great tool for generating test data, and a procedural language such as VB.NET in a full debugging environment is a powerful and highly productive tool for implementing the core test data logic
- Create separate packages for parts that don't always run together, but use a Data Source to centralize connection information
- Pre-compile scripts only when necessary
- When possible, create your connection managers and sources early or before other components, having meta data available streamlines the design experience
- Resolve validation issues by splitting conflicting functionality into multiple packages, or by delaying or disabling validation on the offending components
- The script component can act as a source, a transform or a destination in the data flow
- Both variables and data flow paths (i.e. inputs and outputs) appear as strongly typed objects in the script component
- Use the obvious speed advantages of FastLoad whenever possible
Since you made it this far, I hope you've found some nuggets to take home, despite the somewhat introductory level. If you're really enthusiastic, you can check out and even run the packages by clicking download.
With this groundwork in place, look out for some meatier benchmarking articles coming down the line.
Kristian Wedberg is a Business Intelligence consultant living outside London, UK. He can be reached at this email address: trk2061 [at] wedberg.name
- Disclaimer: Opinions and comments expressed herein are my own, and does not necessarily represent those of my employer.

