When you subscribe a cloud service to host, backup or share your files, you get a free storage tier with a quota you have to manage. When it reaches the storage limit, you either pay for additional storage or delete files that are not useful anymore. You can also copy files onto a local storage device and remove them from the cloud.
The same practice should be done with some quick growing database tables. The growth rate on audit or log tables is usually high and policies about how to manage the records should be in place so the manageability and performance of the overall system is preserved. To put in place such a policy there are some pointers to reflect upon.
If the records can be deleted, consider this:
- When will the records expire, what will be your data retention window?
- What size and volume of records will be purged, how much space will be recovered?
- How will the elimination process work?
On the other hand, if the information has to be persisted, ask management these questions:
- If it can’t be deleted, how often will it be accessed and viewed?
- Can it be moved to cheaper storage with slower response times?
- Can you dump the information to a secondary site, deleting it from the main system?
- Does it have to be online, or can we somehow archive the records?
The second scenario, where we never delete, is not desirable at all for audit and logging table. Firstly because it spends storage resources much needed for main businesses on top of the IT infrastructure. Second because as the data grows maybe to some tens or hundreds of GB, these large datasets will, at some point become huge, causing poor performance for backups and online access to data.
Going forward with the data lifecycle management, after considering the retention period criteria and what size that will amount to, we must address the SQL Server mechanism to perform the desired purge. Let’s explore the following scenarios:
- Keep the active records and truncate the remaining records;
- Progressively delete the expired records, on a scheduled basis;
- Partition tables using the expiration date as the partitioning function;
- Take advantage of the system versioned tables (SQL 2016 and later).
On all scenarios, we assume there are no foreign keys with the audit and logging tables as parents.
For the first scenario, keep the active records and truncate the remaining records, let’s work with a sample dataset loaded onto a SQL Server database. Our sample dataset will be the Seattle Police Department 911 Incident Response. It holds all the Police responses to 9-1-1 calls within the city. You can download it here.
Having a database named “SPD911Calls” with a table holding all the call records named “Seattle_Police_Department_911_Incident_Response”, let’s take on the challenge of keeping only the records from present year forward. First we create a clustered index on the “Event Clearance Date” column. We assume it’s an ever growing date/time value and that it’s never updated:
USE [SPD911Calls]
GO


CREATE CLUSTERED INDEX [IX_EVT_CLEAR_DATE]
ON [dbo].[Seattle_Police_Department_911_Incident_Response]
(
       [Event Clearance Date] ASC
)WITH (PAD_INDEX = OFF, STATISTICS_NORECOMPUTE = OFF,
 SORT_IN_TEMPDB = OFF, DROP_EXISTING = OFF,
 ONLINE = OFF,
 ALLOW_ROW_LOCKS = ON,
 ALLOW_PAGE_LOCKS = ON)
GO
Now let’s check what volume of information we are intending to discard:
select year([Event Clearance Date]) "year", count(*) "ct"
from [Seattle_Police_Department_911_Incident_Response]
group by year([Event Clearance Date])
order by 1
We get the following amount of records, grouped by year:
year | ct |
1899 | 15968 |
2009 | 23 |
2010 | 127957 |
2011 | 228065 |
2012 | 255833 |
2013 | 54684 |
2014 | 216082 |
2015 | 234749 |
2016 | 184553 |
So we intend to keep a rough 16% of the table rows. It’s a bigger effort and it will require a bigger transaction to delete the expired records than to keep the most recent ones and truncate everything else. Let’s try out the following process:
- Copy records to keep to a temporary table;
- Truncate records from the calls table;
- Insert copied records back into the calls table.
The T-SQL script can be like this:
SELECT *
INTO #TempTable
FROM Seattle_Police_Department_911_Incident_Response
WHERE year([Event Clearance Date]) > 2015

TRUNCATE TABLE Seattle_Police_Department_911_Incident_Response

INSERT INTO Seattle_Police_Department_911_Incident_Response
SELECT * FROM #TempTable

SELECT count(*) FROM #TempTable

SELECT count(*) FROM Seattle_Police_Department_911_Incident_Response

GO
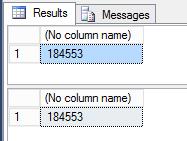
The SELECT statements are only to check that the number of records on the temporary table was all inserted back into the original calls table:

For our second scenario, progressively delete the expired records, on a scheduled basis, let’s start over again and restore all records back into place. Let’s imagine that we only want to delete records earlier than the year 2013 and that we have no free timeframe to perform this intervention. It’s a good use case for a progressive purge that doesn’t require availability interruption.
We begin by indexing the “CAD CDW ID” column. It should be a primary key, but if you analyze the original dataset there are 29 repeated rows:
SELECT *
FROM [dbo].[Seattle_Police_Department_911_Incident_Response]

WHERE [CAD CDW ID] IN (
             SELECT [CAD CDW ID] --,COUNT([CAD CDW ID])
             FROM [dbo].[Seattle_Police_Department_911_Incident_Response]
             GROUP BY [CAD CDW ID]
             HAVING COUNT([CAD CDW ID]) > 1
             )
GO
We won’t bother cleansing the data but use a regular non-clustered index instead. This sequential numeric identifier together with the already known “Event Clearance Date” will be the criteria to obtain the amount of records to be deleted:
SELECT count(*)
FROM [dbo].[Seattle_Police_Department_911_Incident_Response]
WHERE [Event Clearance Date]<'20130101'
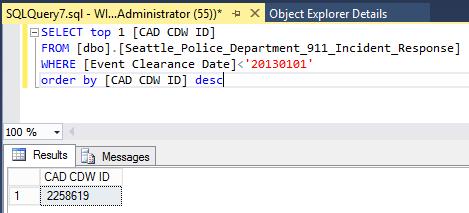
After we get the amount of records to delete, we’ll search for the sequential identifier of the last record to be deleted:

So now it’s a matter of developing a scheduled process to gradually delete all records with an ID smaller than the one presented in the results pane. We’ll have to define a maximum amount of records to delete each turn and foresee that eventually all expired records will be deleted. An example of a complete script that could be used with SQL Agent to schedule gradual deletes is presented below:
DECLARE @IDMax BIGINT
DECLARE @BatchSize INT = 1000
DECLARE @DeletedRows INT = 1
DECLARE @TotalRowsToDelete INT
DECLARE @TotalDeletedRows INT = 0


SET @IDMax =
(
       SELECT top 1 [CAD CDW ID]
       FROM [dbo].[Seattle_Police_Department_911_Incident_Response]
       WHERE [Event Clearance Date]<'20130101'
       order by [CAD CDW ID] desc
)


-- If there are no mre rows to delete, process ends here
IF @IDMax IS NULL
RETURN

-- Total amount of rows to be deleted, outside the retention period
SET @TotalRowsToDelete =
(
       SELECT count(*)
       FROM [dbo].[Seattle_Police_Department_911_Incident_Response]
       WHERE [Event Clearance Date]<'20130101'
)

SET @DeletedRows = 1
WHILE (@DeletedRows > 0)
BEGIN
       DELETE TOP (@BatchSize) FROM [dbo].[Seattle_Police_Department_911_Incident_Response]
       WHERE [CAD CDW ID] < @IDMax

       SET @DeletedRows = @@ROWCOUNT
       PRINT 'Deleted call records (' + CONVERT(VARCHAR(8),GETDATE(),108) + '): ' + CAST(@DeletedRows AS VARCHAR)

       SET @TotalDeletedRows = @TotalDeletedRows + @DeletedRows

       -- In case we've deleted 10 batches, we'll let it rest and execute it on the next scheduled time.
       IF (@TotalDeletedRows = @BatchSize * 10)
       BREAK
END


PRINT '# Total Records Purged: ' + CAST(@TotalDeletedRows AS VARCHAR)
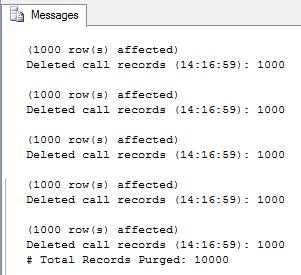
The script can be tuned by choosing how many records I want to delete on each statement (@BatchSize) and the total amount of turns I want to delete before pausing the process. The execution output is as follows:

For the third scenario, we need to partition the table. Take into consideration that we’ll be building this up for a solution using SQL Server 2016. Let’s check out how many records a year exist on the table:
select  year([Event Clearance Date]) "year", count(*) "ct"
from Seattle_Police_Department_911_Incident_Response
group by year([Event Clearance Date])
order by 1 asc
Using the result, we figure to partition the table with more or less even yearly slices from 2010 and onwards:
year | ct |
1899 | 15968 |
2009 | 23 |
2010 | 127957 |
2011 | 228065 |
2012 | 255833 |
2013 | 54684 |
2014 | 216082 |
2015 | 234749 |
2016 | 184553 |
So let’s define our partition function based on the first day of each year, and leaving the first partition for all records prior to 2011:
CREATE PARTITION FUNCTION YearlyRangePF2010 (datetime)
AS RANGE RIGHT FOR VALUES
('20110101', '20120101','20130101','20140101','20150101','20160101')
GO
Afterwards the definition of the partition scheme is needed. Since this is only an example, we’ll leave the data on the primary filegroup:
CREATE PARTITION SCHEME Calls911PartitionScheme
AS PARTITION YearlyRangePF2010 ALL TO ([PRIMARY])
GO
The final step is to apply the partitioning to the table. Because we already had a clustered index on the date/time column, that index has to be dropped and recreated again using the partition scheme:
USE [SPD911Calls]
GO

DROP INDEX [IX_EVT_CLEAR_DATE]
ON [dbo].[Seattle_Police_Department_911_Incident_Response] WITH ( ONLINE = OFF )
GO

CREATE CLUSTERED INDEX IX_EVT_CLEAR_DATE ON dbo.Seattle_Police_Department_911_Incident_Response([Event Clearance Date])
  WITH (STATISTICS_NORECOMPUTE = OFF, IGNORE_DUP_KEY = OFF,
        ALLOW_ROW_LOCKS = ON, ALLOW_PAGE_LOCKS = ON)
  ON Calls911PartitionScheme([Event Clearance Date])
 GO
Let’s confirm our partitions were created using “sys.partitions”:
SELECT o.name objectname,i.name indexname, partition_id, partition_number, [rows]
FROM sys.partitions p
INNER JOIN sys.objects o ON o.object_id=p.object_id
INNER JOIN sys.indexes i ON i.object_id=p.object_id and p.index_id=i.index_id
WHERE o.name = 'Seattle_Police_Department_911_Incident_Response'
The partitions on the table are presented together with each number of records:

As I’ve mentioned at the beginning of the third scenario, we’ll be performing this disposal of records taking advantage of the latest enhancements on SQL Server 2016. The statement we’ll be using is TRUNCATE TABLE with PARTITION. Let’s truncate the partitions holding records prior to 2013:
TRUNCATE TABLE Seattle_Police_Department_911_Incident_Response
WITH (PARTITIONS (1 TO 3));
GO
If we check the number of records, we’ll observe that the earlier ones were truncated from the table partitions:

Of course this doesn’t drop the underlying partitions and file groups so it’s of greater use when you have records rotation on your partitions. For instance, create 12 partitions, one for each month and truncate each after 6 months have passed.
Finally, the fourth scenario is exclusive to SQL Server 2016 or later and it’s mostly about data versioning. System-versioned temporal tables are designed to provide cost-effective solution for scenarios where data audit and point in time analysis are required. But because they are automatically managed by the database platform, you cannot simply choose to manually delete arbitrary records from the audit tables. Management of historical data retention in system-versioned temporal tables is very well documented on MSDN.
While the first two scenarios that were presented can be performed at any time, scenario 3 and 4 require planning and frequent engagement from the database administration staff.
With the data proliferation issues, a well-defined lifecycle for data retention is a growing demand.


