InfoPath 2003 and SQL Server 2000 - Part 3
Introduction
Up to now we have discussed Basics of InfoPath 2003 and How to view data from InfoPath 2003 from the previous articles. Now it's time to discuss the basics of saving data from InfoPath 2003.
Implementation and Database Design
I am always lethargic to record my daily expenses. So I decided to go for InfoPath2003 and SQLServer 2000 for this. My main objective is to learn something from real time experiences.
First I decided to have two tables, one for keeping expenses and other one to categorize them. The following is the script of the both tables.
CREATE TABLE [dbo].[Expenses] (
[ID] [int] IDENTITY (1, 1) NOT NULL ,
[Date] [smalldatetime] NULL ,
[Month] [smallint] NULL ,
[Year] [smallint] NULL ,
[Code] [nvarchar] (10) COLLATE SQL_Latin1_General_CP1_CI_AS NULL ,
[Description] [nvarchar] (50) COLLATE SQL_Latin1_General_CP1_CI_AS NULL ,
[Amount] [money] NULL
) ON [PRIMARY]
GO

CREATE TABLE [dbo].[ExpensesCode] (
[Code] [nvarchar] (10) COLLATE SQL_Latin1_General_CP1_CI_AS NOT NULL ,
[Description] [nvarchar] (50) COLLATE SQL_Latin1_General_CP1_CI_AS NULL
) ON [PRIMARY]
GO
ALTER TABLE [dbo].[Expenses] WITH NOCHECK ADD
CONSTRAINT [PK_Expenses] PRIMARY KEY CLUSTERED
( [ID] ) ON [PRIMARY]
GO
ALTER TABLE [dbo].[ExpensesCode] WITH NOCHECK ADD
CONSTRAINT [PK_ExpensesCode] PRIMARY KEY CLUSTERED
( [Code] ) ON [PRIMARY]
GO
CREATE INDEX [IX_Expenses] ON [dbo].[Expenses]([Year], [Month]) ON [PRIMARY]
GO
CREATE INDEX [IX_Expenses_1] ON [dbo].[Expenses]([Code]) ON [PRIMARY]
GO
ALTER TABLE [dbo].[Expenses] ADD
CONSTRAINT [FK_Expenses_ExpensesCode] FOREIGN KEY
( [Code] )
REFERENCES [dbo].[ExpensesCode] ( [Code] ) ON UPDATE CASCADE
GO
ExpensesCode table contains following records
TRV Traveling
MED Medicine
STAT Stationery and Books
FOOD Foods
OTHER Other Expenses
DONA Donations
I have added Month and Year fields to the expenses table, for these two reasons.
1. I have not found a method to inquire a whole months worth of data from InfoPath 2003. Once again, if anybody knows you can educate us.
2. If you were to inquire from month and year repeatedly for better performances, you would be better to have two separate columns.
These fields will be updated from a trigger called trgUpdateMonthYear.
create trigger trgUpdateMonthYear on expenses
For insert, update
as
begin
Declare @ExpenseID int
Declare @ExpenseDate smalldatetime
Select @ExpenseID =[id], @ExpenseDate = [date] from inserted
Update expenses Set [Month] = month(@ExpenseDate),[Year] = year(@ExpenseDate)
where [id] = @ExpenseID
end
Every thing is set to start InfoPath2003
InfoPath Design
First step is designing a new form and creating a data source for expenses table as we did in the part 2 of this series.
After the getting the first screen you can do the necessary changes to the caption of the headings. Delete data view as we do not need it.
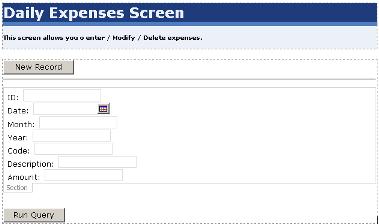
Figure 1 : First screen after doing some changes to the caption of the
heading after the wizard.
Next step is to add the Repeating Table section. Then
select Date, Code, Description, and Amount fields from data fields. Make sure that
you do not select Year and Month from the list as those fields are updated by
the trigger trgUpdateMonthYear. Remove ID, Amount from the latter part, which is
the inquiry part. As usual I have done some formatting. Hope you will not find
any difficulty in completing this.
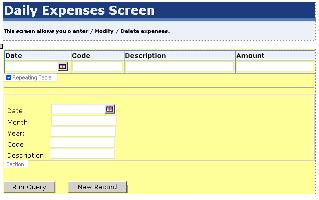
Figure 2 : After adding Repeating table
Next step is the adding the combo list for expenses code.
First delete the text box of expenses code which is laid in the repeatable
table. Then drag an drop the drop-down list box from the controls
and bind the ExpensesCode of the data fields. Then right click the drop-down
list and select properties. In the data tab, select ExpensesCode
as the new data source. Then select the XPath button which is indicated
at the Figure 3. In that, select ExpensesCode group from the list. By
Selecting other two buttons respectively, you can select code and description
for the relevant filed. Why we need two fields? Code is to write to the expenses
code and description is to display for convenience of the user. It will be nice
to display "Traveling" rather than "TRV". Isn't it?.
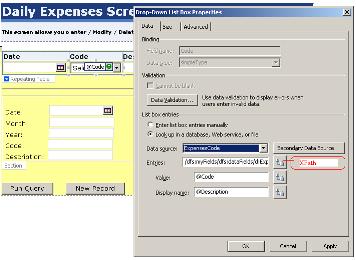
Figure 3 : Configuring Drop-Down list box
Like wise carry out the same procedure for the code in the
inquiry section. Let me elaborate a little on the use of inquiry fields. Let us
say that you want to display expenses which occurred on the date of 1/1/2004.
what you have to do is, enter 1/1/2004 at the date an click Run Query.
Then you will get all the expenses which happened to be on the date of 1/1/2004.
you can do it by combining the two or more fields as well.
Now for the user friendly interface, we can give user to select a month
rather than enter 1 for January 2 for February etc. What we can do is, to have a
Drop-down list box there. For earlier expensesCode we select database to
get data But this time we do not need a database as the values are not changing.
so we can select Enter list box entries manually and enter data for all
the twelve months. Value is what you have store in the database and
Display Name is what you give for the user.
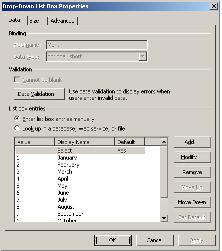
Figure 4 : Entering List Manually
Wouldn't it be nice if you can display the total of the amount which you are
currently entering? There is a special control available for that that is
Expression Box which you will find at the second last control of the
controls list. Drag and drop it to the necessary place of the form. Right click
that control you will get the Property Dialog of the Expression
Control.
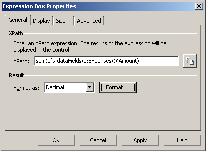
Figure 5 : Property Dialog box of Expression Box
Select XPath and select Amount of data fields. After that type sum to
get the total of amount. You will see initially you will get NaN for this
field. This is because that there is no default value for the Amount field of
the data fields. To avoid this you can set a default value for the amount value.
Also you can do some validations like amount cannot be less that 0.
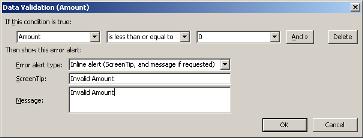
Figure 6 : Validation conditions for the Amount
Then add the submit button( I almost forgot it :-)) . Drag and drop a button
from the controls and set the action to Submit
Data Entry and Inquiry
Now everything is set and ready to go. Click Preview Form. Now you can
enter your daily expenses.
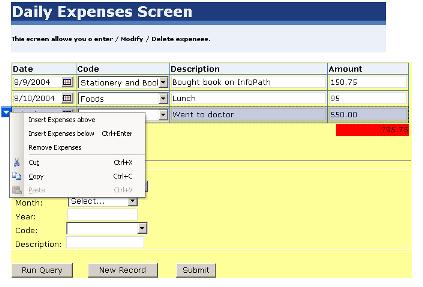
Figure 7 : Entering Data from Info Path 2003
By right clicking the left hand side of repeatable table, you can get a
new line to enter data. If there is any spelling errors you can connect here it
self. Always a good feature to me as I am very much weak in my spelling.
After entering if you want to view the expenses of the month of January,
Select January from the month list an press Run Query.
That is all about entering data from the InfoPath 2003. InfoPath ability to
enter data holds the advantage over the other tools like Crystal Report and
Reporting service where they do not allow you to enter data.
InfoPath2003 SP 1
Before winding up, let me make an
announcement regarding InfoPath 2003 developments. Now Microsoft Office 2003
Service pack one also released!. You can now download and install the official
InfoPath SP1. It is part of the Office 2003 SP1 download.
More details:
http://office.microsoft.com/officeupdate/ . English SP1 download is
here
Please pay special attention to the following if you have installed the InfoPath
2003 SP1 Preview:
If you previously installed the InfoPath 2003 SP1 Preview, you should
uninstall the InfoPath 2003 SP1 Preview prior to installing Office 2003 SP1. You
will need your original InfoPath 2003 product CD to upgrade to the final version
of InfoPath 2003 SP1. For more information, see the Microsoft Knowledge Base
article
(873040): Information to consider before you apply Office 2003 Service Pack 1 to
a computer that has the InfoPath 2003 Service Pack 1 Preview installed
This Service Pack 1 gives you some
additional features. We will discuss those things in next article.


